Python 3 비동기 프로그래밍
이 글은 Python 3.7을 기준으로 작성된 글입니다. Generator, Coroutine에 대해 한번도 들어보지 못하셨다면 이전 글을 먼저 읽으시는 것을 추천드립니다.
Python 3는 Python 2에 비해 상당히 많은 부분이 바뀌었는데 그 중 하나가 비동기 처리 지원입니다.
Python 3.4에서 asyncio 패키지가, 3.5에서 async/await 키워드가 추가되어 파이썬으로 비동기 프로그래밍을 하려면 3.4 이후의 버전을 사용해야합니다.
Python과 비동기 프로그래밍
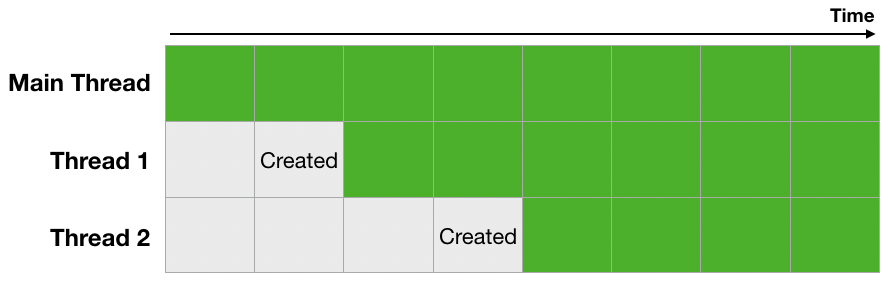
보통 우리가 생각하는 비동기 처리방식이라면 아래와 같은 이미지일 것입니다. 메인 스레드 외에 다른 스레드들이 같은 시간에 동작하는 모습이죠. 그런데 Python의 비동기 처리 방식은 조금 다릅니다.
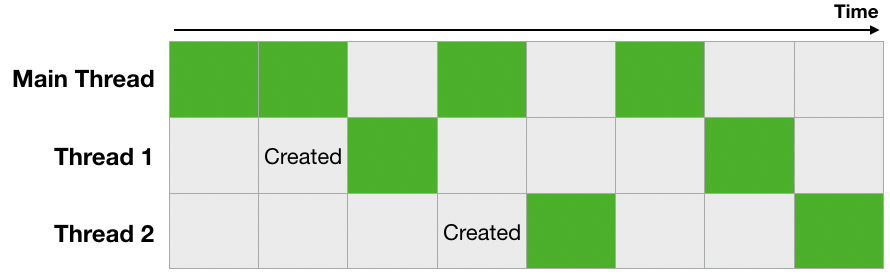
바로 GIL(Global Interpreter Lock)이라는 녀석이 있기 때문에, Python의 스레드는 위 이미지처럼 동작하지 않습니다. 간단히 GIL의 동작 방식을 설명하자면 한 번에 한 스레드만 일을 할 수 있게 전역 인터프리터(Global Interpreter)에 락(Lock)을 거는 것입니다. GIL의 등장 이유와 어떻게 동작하는지 등 자세한 내용들은 나중에 따로 다루겠습니다. 아무튼 GIL이 있어서 실제 Python의 비동기는 아래와 같이 동작합니다.
Blocking I/O
먼저 이 코드를 봅시다. urls 리스트에 있는 url을 하나씩 접속하고 페이지 로드가 끝나면 다음 url을 방문하는 코드입니다.
import timeit
import ssl
from urllib.request import urlopen

context = ssl._create_unverified_context()

urls = [
        'https://xo.dev',
        'https://github.com/blurfx',
        'https://google.com',
        'https://soundcloud.com',
        'https://stackoverflow.com'
        ]

begin = timeit.default_timer()

for url in urls:
    urlopen(url, context=context)

duration = timeit.default_timer() - begin
print(duration)
# output: 2.875913759
import timeit
import ssl
from urllib.request import urlopen
context = ssl._create_unverified_context()
urls = [
'https://xo.dev',
'https://github.com/blurfx',
'https://google.com',
'https://soundcloud.com',
'https://stackoverflow.com'
]
begin = timeit.default_timer()
for url in urls:
urlopen(url, context=context)
duration = timeit.default_timer() - begin
print(duration)
# output: 2.875913759이 코드의 문제점은 금방 살펴봐도 이 정도는 되겠네요.
- 한 번에 하나의 URL밖에 접근하지 못한다
- 그러므로 만약 한 곳을 받는데 오래 걸린다면 그 뒤에 있는 작업들도 그 만큼 딜레이 된다.
- 모든 URL을 방문하기 전까지 다른 작업을 하지 못한다.
잠깐, 그럼 여러 스레드를 만들어서 처리하면 되지 않을까요?
그럼 이번에는 ThreadPoolExecutor를 사용하고, URL 수 만큼 스레드를 만들어서 해봅시다.
import timeit
import ssl
from concurrent.futures import ThreadPoolExecutor
from urllib.request import urlopen

context = ssl._create_unverified_context()


def fetch(url):
    urlopen(url, context=context)

urls = [
        'https://xo.dev',
        'https://github.com/blurfx',
        'https://google.com',
        'https://soundcloud.com',
        'https://stackoverflow.com'
        ]


begin = timeit.default_timer()

with ThreadPoolExecutor(max_workers=len(urls)) as executor:
    for url in urls:
        executor.submit(fetch, url)

duration = timeit.default_timer() - begin
print(duration)
# output: 1.2506647800000001
import timeit
import ssl
from concurrent.futures import ThreadPoolExecutor
from urllib.request import urlopen
context = ssl._create_unverified_context()
def fetch(url):
urlopen(url, context=context)
urls = [
'https://xo.dev',
'https://github.com/blurfx',
'https://google.com',
'https://soundcloud.com',
'https://stackoverflow.com'
]
begin = timeit.default_timer()
with ThreadPoolExecutor(max_workers=len(urls)) as executor:
for url in urls:
executor.submit(fetch, url)
duration = timeit.default_timer() - begin
print(duration)
# output: 1.2506647800000001Non-Blocking I/O (AsyncIO)
이번에는 asyncio와 aiohttp 패키지를 사용해서 위와 같은 작업을 Non-Blocking I/O 방법으로 구현해보겠습니다. aiohttp는 asyncio를 사용하는 HTTP 서버/클라이언트 패키지이며, 기본 패키지가 아니므로 따로 설치해야 합니다.
import asyncio
import aiohttp
import timeit


async def fetch(url):
    print(f'Request: {url}')
    connector = aiohttp.TCPConnector(ssl=False)
    async with aiohttp.ClientSession(connector=connector) as session:
        async with session.get(url) as response:
            await response.text()
    print(f'Done: {url}')


async def fetch_all_urls(urls):
    fetches = []
    for url in urls:
        fetches.append(fetch(url))
    await asyncio.gather(*fetches)

urls = [
        'https://xo.dev',
        'https://github.com/blurfx',
        'https://google.com',
        'https://soundcloud.com',
        'https://stackoverflow.com'
        ]


begin = timeit.default_timer()
asyncio.get_event_loop().run_until_complete(fetch_all_urls(urls))
duration = timeit.default_timer() - begin
print(duration)
import asyncio
import aiohttp
import timeit
async def fetch(url):
print(f'Request: {url}')
connector = aiohttp.TCPConnector(ssl=False)
async with aiohttp.ClientSession(connector=connector) as session:
async with session.get(url) as response:
await response.text()
print(f'Done: {url}')
async def fetch_all_urls(urls):
fetches = []
for url in urls:
fetches.append(fetch(url))
await asyncio.gather(*fetches)
urls = [
'https://xo.dev',
'https://github.com/blurfx',
'https://google.com',
'https://soundcloud.com',
'https://stackoverflow.com'
]
begin = timeit.default_timer()
asyncio.get_event_loop().run_until_complete(fetch_all_urls(urls))
duration = timeit.default_timer() - begin
print(duration)위 코드의 결과는 어떻게 될까요? 매번 실행할때마다 달라집니다! 저는 아래와 같이 나왔네요. 어라, 시작 순서와 끝난 순서가 일정하지가 않네요? 맞습니다. 비동기적으로 작업을 처리했기 때문에 늦게 시작했더라도 먼저 끝났다면 출력이 먼저 된것입니다.
Request: https://xo.dev
Request: https://github.com/blurfx
Request: https://google.com
Request: https://soundcloud.com
Request: https://stackoverflow.com
Done: https://xo.dev
Done: https://google.com
Done: https://stackoverflow.com
Done: https://soundcloud.com
Done: https://github.com/blurfx
1.714294627
위 코드에 설명을 조금 보태자면:
get_event_loop()함수를 호출하여 이벤트 루프를 가져옵니다.ㅍfetch_all_urls()함수에 url 리스트를 넘겨줍니다.- 받은 url 리스트를 순회하며 각 url마다
fetch()함수(코루틴)를 실행시켜 주고 한 리스트에 넣어줍니다. fetch()함수는 입력 받은 url에 대해 aiohttp를 사용하여 Reqeust를 날리고 Response가 올 때까지 대기하다가 종료됩니다.asyncio.gather()함수가 에 코루틴 리스트를 넘겨줍니다. 이 함수는 넘겨받은 모든 코루틴의 작업이 끝날때까지 기다렸다가 종료되면 그 결과를 반환해줍니다.
이 예제만 보면 asyncio를 사용해서 뭔가 엄청 큰 변화가 일어나지는 않았습니다. 또한 여전히 GIL의 영향을 받으므로 한번에 하나의 작업만 처리합니다. 그런데 왜 사람들은 asyncio를 사용할까요?
- 비동기 I/O 작업을 더 편하고 깔끔하게 할 수 있습니다.
- Python 3.5에서
async와await이 추가되며@asyncio.coroutine같은 거추장스러운 데코레이터 없이 간결한 코드 작성이 가능해졌습니다.
- Python 3.5에서
- 기존 패키지 및 코드와의 연동
- Context-Switching의 오버헤드가 없습니다.
- 또한 멀티 프로세스 방식을 사용할때보다 빠릅니다.
- 메모리 사용량도 더 적습니다.
이 글을 쓰며 asyncio가 생각보다 진입 장벽이 높을것 같다는 느낌을 많이 받았습니다. 하지만 한 번쯤은 시간을 내어 사용해보시는걸 추천합니다. 어렵게 보이지만 생각보다 어렵지 않아요.
감사합니다. :)